Switching accounting software can be a daunting task for any business, especially when transitioning between platforms like Xero and QuickBooks Online. But with MMC Convert’s self-service tool, specifically designed for Xero to QBO conversion for Singapore businesses, the process is streamlined and stress-free. This user-friendly solution empowers you to take control of your data migration, ensuring accuracy and efficiency every step of the way.
MMC Convert’s self-service tool is a user-friendly solution designed for converting Xero to QuickBooks Online.MMC Convert offers free migration from Xero to QuickBooks Online for Singapore businesses & can migrate up to one historical year plus the current year to date from Xero to QuickBooks Online Free of cost (i.e Sponsored by QuickBooks Online). For a file size of up to 2,000 transactions, the migration will be completed within 3 hours. However, if the tool encounters any issues with your Xero file, the MMC team will work to resolve them and deliver your file within 72 hours
Steps for Conversion from Xero to QBO with Self Service Tool
Please follow the steps outlined below to complete the conversion process using our self-service tool.
To start with the conversion process, you would need to click on the below link and click on the ‘Let’s Go’ Tab
https://xerotoqbo.mmcconvert.com/connect_input_tool
Step 1: Company Details
Once you click on the ‘Let’s Go’ tab you would need to enter the company details which needs to be converted from Xero.
Note: Please ensure that you enter the same company name used when creating the Xero account.
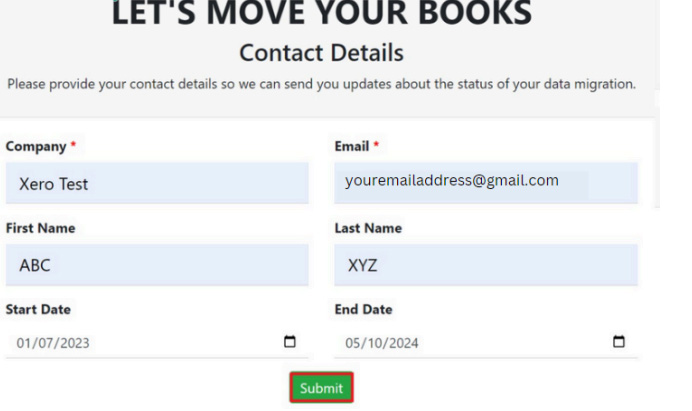
In the ‘Start Date’ field, enter the date from which the conversion should begin, and in the ‘End Date’ field, input the last date of the transactions recorded in Xero. After filling in the details, click the ‘Submit’ button
Step 2: Connect Xero account
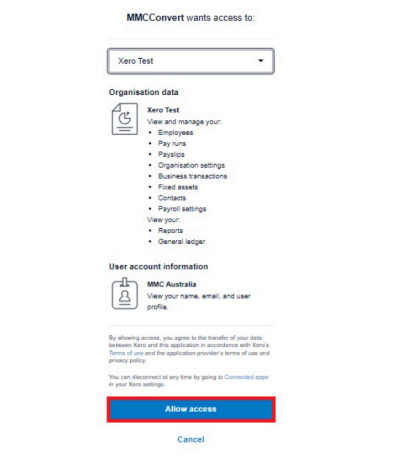
Once you click on the ‘Submit’ Tab you need to connect your Xero account to the self serve tool. This will enable the tool to fecth the data from Xero
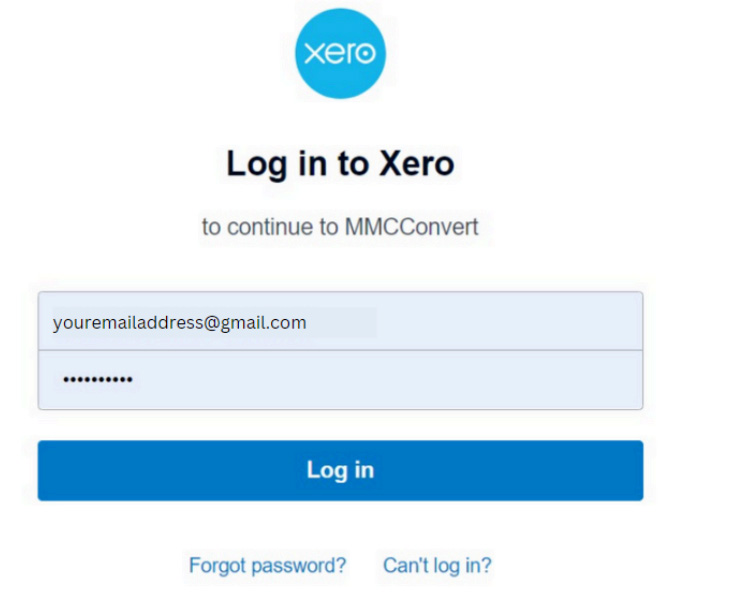
Step 3: Select the Xero file
Once the Xero file has been connected to the self serve tool, you would need to select the Xero file from which you want to convert the data
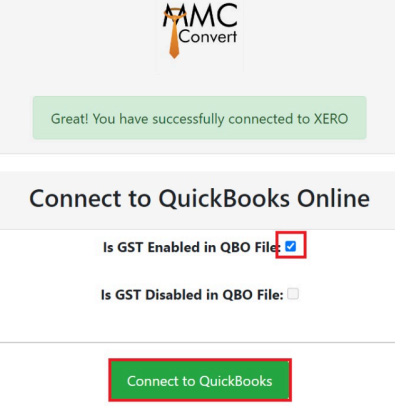
Step 4: Enable GST feature
If your business is registered under GST, you need to turn on GST in QuickBooks Online file and would need to tick mark the ‘Is GST Enabled in QBO File
Step 5: Connect QuickBooks Online file
To get the data imported into your QuickBooks Online file, you need to select the QuickBooks Online file in which you want to import the data
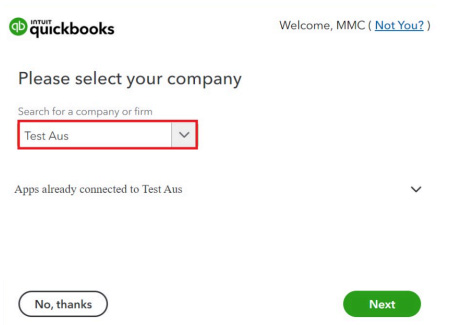
Step 6: Connect QuickBooks Online file
To get the data imported into your QuickBooks Online file, you need to select the QuickBooks Online file in which you want to import the data and click on the ‘Next’ tab

Now that both your Xero and QuickBooks Online file have been connected to the self serve tool, you can start the conversion process by clicking on the ‘Start Conversion’ tab.
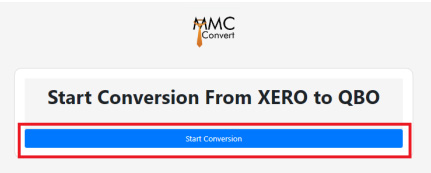
Please make sure that you avoid using both Xero and QuickBooks Online file while the conversion is running or it might fail !
Step 7: Conversion Status
Once the conversion process has been started by the self serve tool, you will get a notification on your email that the conversion process has been initiated. You can also check that status of your conversion by clicking on the ‘Click Here’ tab on the tool
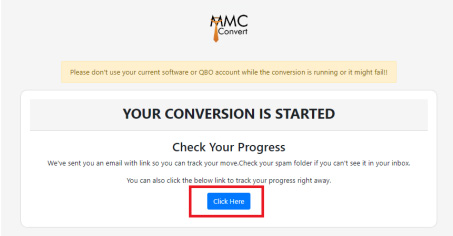
Once you click on the ‘Click Here’ tab, you would be able to check live status of your file
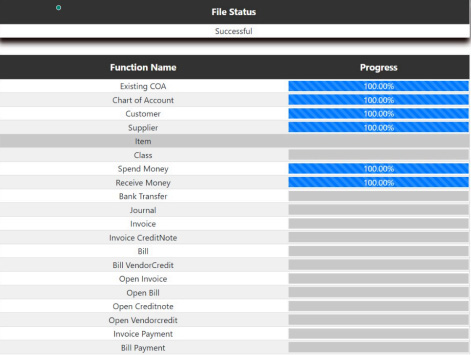
Step 8: Conversion Complete
Once the conversion has been completed, you will get a notification on your email stating that the conversion of your file has been completed successfully along with the comparative reports from both Xero and QuickBooks Online
How does the transfer process work?
1. Review the Pre-Conversion checklist section in this document.
2. Prepare your current Xero file for transfer and ensure your QuickBooks Online file is set up correctly.
3. Fill out the online order form on MMC landing page. (You shall get free data migration for one historical year plus the current year to date for single currency file.)
4. You will receive an email with a link to the MMC self serve migration tool.
5. Follow the step by step guidance in the tool.
6. Connect to your Xero file.
7. Connect to your QuickBooks Online file.
8. Follow the conversion process and wait for it to complete.
9. You will receive an email notification when the conversion is complete along with Quality Analysis reports.
10. Follow the Post-Conversion checklist and start using your QuickBooks Online file
Product version requirements
Xero: You must be using a Xero Singapore file.
QuickBooks Online: You must have a paid subscription to QuickBooks Online AU file (Plus or Premium). Make sure you have a QuickBooks Online plan that includes the necessary features for a successful data conversion.
What can be converted through self serve tool?
- Chart of Accounts
- Customers details
- Vendors details
- Inventory Items list (specifically, Item Name, Description, cost- Sales price/rate and Item code)
Since the tool does not handle the tracked inventory, We import all the “Inventory” as “Non-Inventory” type in QBO and after the completion of the migration, your team needs to manually change the type non-inventory to Inventory and add the quantity on hand manually for each item. Non-Inventory (specifically, Item Name, Description, costSales price/rate and Item code)
- Tracking categories in Xero will be brought as class in your QuickBooks Online file
- Opening balances
- Invoices and Credit note (AR)
- Bills and Bill Credit (AP)
- Bank account transactions (Spend Money, Receive Money, Transfer Money)
- Payments (Bills and Invoices)
- Journal
What cannot be converted through self serve tool?
- Assembly builds
- Budgets
- Memorized transactions
- Deleted transactions
- Draft or unposted journals
- Draft Invoices and Bills
- Jobs Estimates and Purchase orders
- Expense Claims
- File attachments
- Invoice template and other templates
- Terms list
- Employees list
- Payroll information, if any (employee details, pay calendars, tax information and pension, etc.) Project details, if any (quotes and estimates, tasks and expenses, profitability, etc.)
- Fixed Assets management
Pre-conversion checklist for Xero to QBO Conversion with Self Service Tool
To ensure the highest quality conversion, several essential steps must be completed in your Xero and QuickBooks Online account beforehand. It is vital that the data in Xero is well-organized prior to the conversion to avoid migrating disordered data. By following the steps outlined below, your data will be in the best possible condition for the conversion. Please make sure to follow these steps in the specified order. Each step indicates whether it is mandatory or optional; any optional steps can be addressed after the conversion is complete
Step 1: Purge your QuickBooks Online account and configure required settings (MANDATORY)
Data cannot be migrated into a QuickBooks Online account that already contains existing data. Therefore, it is essential to ensure that there are no pre-existing transactions in the QuickBooks Online company file. We highly recommend verifying that your file is empty, as this will lead to a cleaner conversion
You can follow the below steps to purge/remove exisiting data from your QuickBooks Online account.
Step 1. In the URL section at the home page of your QuickBooks Online account. https://qbo.intuit.com/app/purgecompany Once you enter the URL, QuickBooks Online account will show you the number of transactions present within your QuickBooks Online account
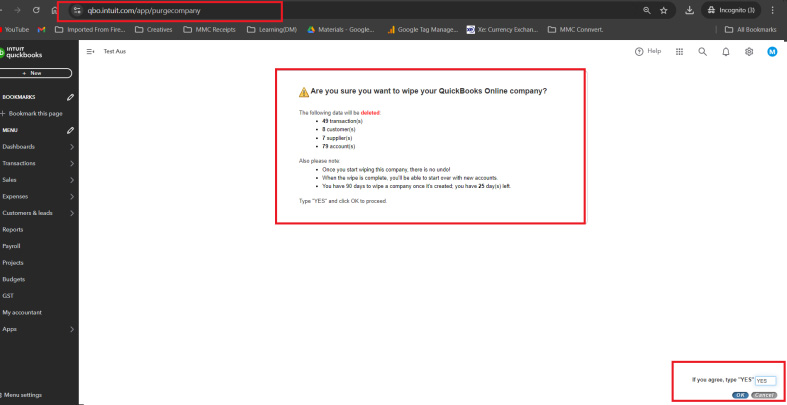
Step 2. At the bottom of your screen you need to type ‘YES’ and click on ‘OK’ tab.
Step 3. Once you click on the ‘OK’ tab you need to select you need to select ‘Create an empty chart of accounts (select only with the advice of an accountant).’ option and click on the ‘Wipe Data’ option. This will ensure that all the existing data has been removed from the QuickBooks Online account and conversion process can be done stremlined.
Step 2: GST Feature (MANDATORY)
If your business is registered under GST, you need to turn on GST in QuickBooks Online file.
Step 1. Click on the GST tab at the left hand side of your screen and click on the ‘Get Started’ tab,
Step 2. Once you click on the ‘Get Started’ and a prompt will show-up with two options Option 1. Accrual Option 2. Cash You need to click on the ‘Accrual’ tab. Once you click on the tab GST would be activate in your QuickBooks Online account. Alternatively, if the business is not registered in GST you don’t need to turn on GST in your QuickBooks Online file.
Step 3: Xero Reconciliation (MANDATORY)
You will need to reconcile all your bank and/or credit card accounts with the most recent statements available. By completing this step, you will ensure that all bank and credit card accounts are accurately reflected in Xero.
Step 4: Extraction of Reports from Xero (MANDATORY)
The self-serve tool does provide a comparative reports between both Xero and QuickBooks Online once the transfer has been completed.
However, you must extract the following reports to verify your data after the transfer: 1. Balance Sheet 2. Trial Balance 3. A/R Ageing Summary 4. A/P Ageing Summary 5. Profit and Loss
Post-Conversion Checklist for Xero to QBO Conversion with Self service tool
We assume you have already completed the preconversion steps and can now proceed with the remaining items on this list. This checklist details the specific post-conversion steps for Xero conversion. We suggest you compare the following reports in QuickBooks Online and in Xero to ensure that your data was transferred correctly
Step 1: Verify the imported data (MANDATORY)
The self serve tool will provide you with comparative reports between both Xero and QuickBooks Online. However, it is important that you verify the reports, run the following reports for the conversion period, 1. Balance Sheet 2. Trial Balance 3. A/R Ageing Summary 4. A/P Ageing Summary 5. Profit and Loss
Step 2: Bulk Reconcile Bank and credit card accounts (MANDATORY)
With the self serve tool, all the bank and credit card accounts will be imported into your QuickBooks Online account.
However, after the completion of the conversion process, you need to bulk reconcile the bank and credit card accounts which will take few minutes. It is critical that you complete this step before connecting your bank and credit card accounts to online banking.
Please see the below steps on how to reconcile your bank or credit card
1. Go to Settings ⚙ and select Reconcile.
2. Select a relevant bank account from the Account ▼ dropdown.
3. Enter an Ending balance(as per the trial balance run on the transfer date).
4. Enter any other information as required depending upon the bank account you’ve selected.
5. Select Start reconciling. A list of transactions displays.
6. Tick the box in the header row to select all transactions in the list.
7. Untick the transactions that are not yet cleared. When the difference is zero you have completed these steps successfully.
8. Select Finish now, then select Done.
9. Repeat the above steps for all bank and credit card accounts in QuickBooks Online
Conclusion
MMC Convert’s self-service tool simplifies the often complex process of migrating from Xero to QuickBooks Online. This user-friendly solution empowers Singapore businesses to take control of their data migration, ensuring accuracy and efficiency. By following the steps outlined in this guide, you can seamlessly transition to QuickBooks Online and leverage its robust features for enhanced financial management.
Contact MMC Convert today to explore how our expertise can further streamline your accounting processes and drive business growth.
